Designing a Microgreens Site Layout: Creating Flow, Minimizing Risk
Introduction to Microgreens Workflow
When setting up a microgreens production site, one of the most impactful — and often underappreciated — tasks is designing a site layout that supports efficient workflow and reduces the risk of contamination. Whether you’re working in a greenhouse, warehouse, or backyard setup, your layout directly affects how well your system runs. A well-organized layout supports cleanliness, reduces labor, and sets you up for scalable success.
This article builds on core principles from sprouting production guidelines, which emphasize one key idea: keep your production zones separate. By doing so, you not only support efficient movement through the system but also minimize the likelihood of cross-contamination — particularly between soil, seed, water, tools, and finished product.
The Logic of Separation: Inputs, Production, Outputs
At a high level, a microgreens operation has three types of zones:
- Inputs (soil, seed, trays, water)
- Production (germination and growing area)
- Outputs (harvested product, compost, cleaned trays)
A clean layout moves these inputs through the production area and separates them into distinct post-harvest outputs. When each component has a clearly defined space, it becomes easier to train staff, maintain cleanliness, and prevent confusion or inefficiencies.
A Sample Layout and Microgreens Workflow
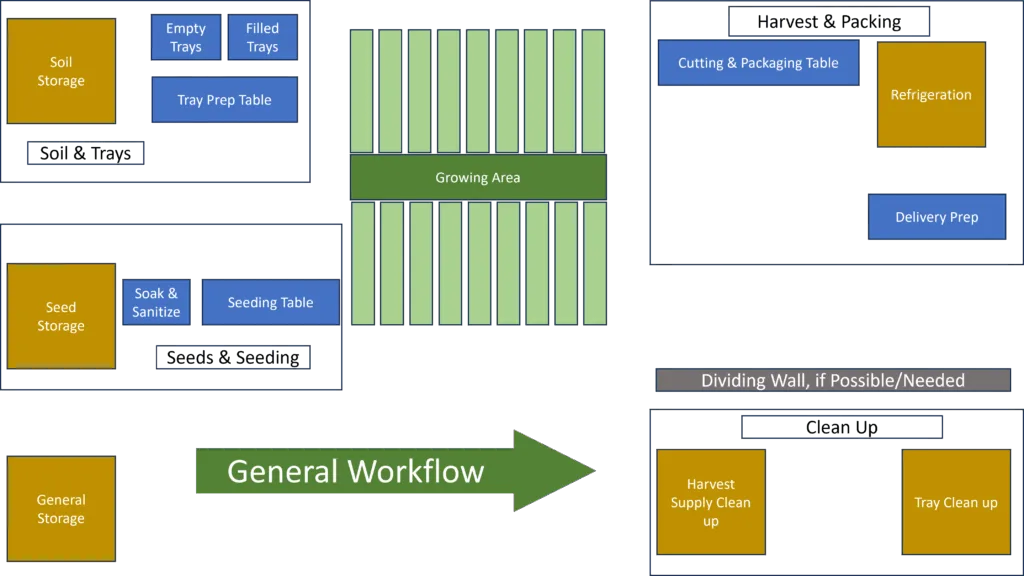
Let’s walk through a general layout — similar to the one shown in the diagram provided — and follow the directional flow of materials through the system.
1. Soil Storage and Tray Prep Area
- Soil enters the system and is kept in its own area, isolated from seed and compost zones.
- Tray preparation happens here: empty trays are filled with soil and prepped for seeding.
- Trays move from prep to the seeding zone.
2. Seed Storage and Seeding Area
- Seeds are kept in a cool, dry, clean space, separate from soil and compost.
- A soak and sanitize station sits next to the seeding bench.
- Prepped trays from the soil area are seeded here and passed into the growing zone.
3. Growing Area
- Trays are moved into the growing area, which could be a greenhouse, hoop house, indoor rack system, or benches.
- This is the central zone where the crop develops.
4. Harvest and Packaging Zone
- Mature trays are brought to the harvest station, ideally in a dedicated room or area.
- Product is cut, washed, spun dry, weighed, and packed here.
- Refrigeration and delivery staging happen nearby, but distinct from the rest of the workflow.
5. Compost and Tray Washing Area
- After harvest, used soil is moved to the compost bin or removed from the site.
- Dirty trays go into the tray wash station for rinsing, scrubbing, and sanitizing.
- Once cleaned, trays are returned to the tray prep area to begin the cycle again.
The flow can be summarized simply: Input → Production → Harvest → Output. With cleaned materials looping back to the start, and organic matter exiting the system as compost.
Additional Design Principles for Microgreens Workflow
- Use a Dividing Wall or Barrier: If space allows, create a physical barrier between clean and dirty areas — especially between the growing/harvest zone and the tray wash area.
- Unidirectional Workflow: Always move forward. Avoid looping back or crossing paths with dirty materials.
- Protect High-Risk Zones: Your seed, sanitizing, and packaging areas should be particularly well-protected from exposure to compost, standing water, or foot traffic from soil zones.
- Label Everything: Clear signage helps reinforce spatial separation and workflow rules, especially for new staff.
Indoor and Outdoor Variations
This system isn’t limited to one type of space. You can apply these same principles to an indoor rack system in a basement, a hoop house in a backyard, or a commercial warehouse. In some cases, indoor spaces may integrate more functions into a single room — but the zones still need to be respected and clearly delineated.
If you have both indoor and outdoor components, be mindful of how trays move between them. Use clean carts, dedicate tools to each space, and avoid bringing excess moisture or contamination into clean areas.
In Closing
A thoughtfully designed site layout is one of the best long-term investments you can make in your microgreens operation. It keeps your system flowing smoothly, supports food safety, and reduces fatigue and inefficiencies.
While your exact layout will depend on your space, scale, and budget, the principles of separation, directionality, and clarity remain constant. Design for cleanliness, design for flow — and you’ll design for success.
Stay tuned for additional workflow-focused guides on optimizing each of these production areas.
Leave a Reply